Saturday, June 26, 2010

Photos...

Since my last post there has been some further work done on the mask; I’ve extended its borders because I felt it was too small, reshaped the nose and brow and have begun work changing the eyelids, favoring a much simpler, cleaner shape than I had started with, which was tending towards the classical.

It’s odd looking at the life-cast because it actually doesn’t look very much like me at all! It was made with me lying down and something about the process has meant that the original mold has stretched somehow. When compared side-by-side with my face (which I won’t be doing here), it as if I’m holding a cast of someone else!

Anyway, here are the photos of the sculpture:


The lines scratched into the surface are from using the rake tool (as seen below at top). That was to remove excess clay from the areas that needed trimming back and to shape the curves of the temple and cheeks. These will then be smoothed with the fingertips. You can also see that the second and third tools from the top have latex covered tips, for gentler sculpting in tricky areas, such as around the eyes.


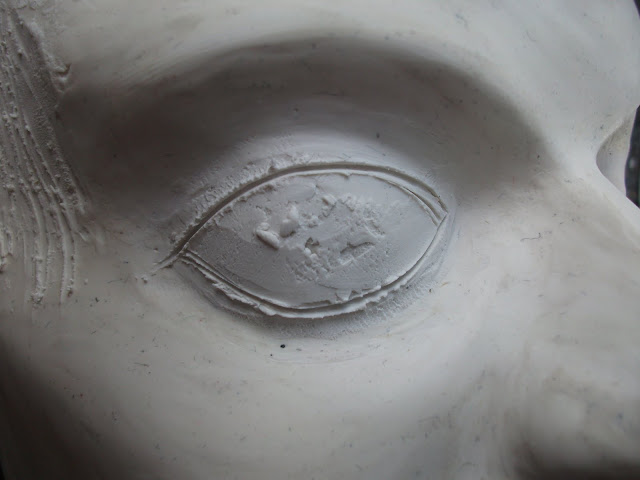
As seen in the photo above and below, the eye is too large and the eyelids are too defined, rather like a classical statue.


The picture above shows a temporary nostril dent. This is in the wrong place - it is too far to the viewer’s left and will therefore be changed. The nose itself is too bulky and needs streamlining.


Layering clay over the eye, having first removed the eyelids.


Having smoothed down the clay, I’ve now cut in the basic shape of the new eyelids.


I’ve now begun creating a rough eyeball so that the eyelids are exposed.


(above and below) Further refinements for the eye, but not yet finished. I’ve also smoothed down the raked areas of the mask. I’ve also added further bulk to the ridge of the brow above the nose.


Next Post: Further photos as the work progresses.

Friday, June 11, 2010

An Introduction...

I recently decided to take advantage of having had my face cast in plaster for a project at university to create my own Phantom of the Opera mask, a mask specifically designed and constructed to fit my own face. I have been a fan of Andrew Lloyd Webber’s Phantom of the Opera ever since I discovered the musical in 1988, when I was 18 years old and only just starting to tread the boards myself. Hearing that show’s original cast recording began a life-long passion for musicals, and I have been lucky as an actor who can sing to have taken part in many professional musicals over the years (however, being a part of the show that originally inspired me is something I have yet to experience).

As someone who started out with the intention to become an artist, specifically a special-effects make-up artist, before acting diverted me from that path, I have also had many years of drawing and sculpting experience behind me. Making my own Phantom mask seemed like a straight-forward idea - sculpt the famous visage, make molds and cast it in a tough material, most likely plastic. At the time of this writing the sculpting stage is as far as I have got - I have yet to make molds and cast the mask. But all in good time.

Phantom designer Maria Björnson’s ingenious concept for the Phantom’s disguise - a half-mask that allows the audience to see the actor’s expressions (based upon the masks worn by soldiers who had been badly wounded in WWI) - has been adapted to fit the faces of the many different performers who’ve played the Phantom around the world over the years. And when you look at photos of those actors who’ve inhabited the role past and present, the mask is always different in some way - place them side by side and you’ll see that no two masks are the same. This is simply because the design has to be able to incorporate the unique facial features of each actor, as well as the prosthetics of Erik’s terrible deformities beneath the mask. There are certain lines that remain the same - the silhouette has essentially been unchanged since 1986 - but the shape of the nose, the eyebrow, the cheek and temple all have subtle variances in accordance to the features of the actor.

Using researched images as inspiration (such as at left), I began sculpting the mask using inexpensive oil-based clay. Its thickness varies according to the shape. For instance, the cheek and temple are approximately 1.2 centimeters thick, whereas the edges of the brow and the left side of the nose are maybe 3-4 millimeters in thickness. I’m unable to show you the stages of how I sculpted the mask, simply because I have no photos of the process - unfortunately I had no camera at the time and the sculpting was all but finished virtually within a day - and as the sculpt is almost complete and it has only just occurred to me to document the project and blog about it, I have halted progress so that I can take photos and record the various phases.

Next Post: Photos of the sculpted mask on my life-cast, with a discussion of the challenges of creating it.